What is GeoEvent Simulator?
GeoEvent Simulator is a Windows application available with ArcGIS GeoEvent Server that can be used to send event data from a simulation text file or feature layer to a specified TCP socket. Event data sent from GeoEvent Simulator are received by a TCP/Text input in GeoEvent Server which hosts and monitors the TCP socket to which simulated data is being sent. The input's TCP Transport receives the data as a byte stream; the input's Text Adapter uses a GeoEvent Definition to interpret the data to create a GeoEvent. If the input is incorporated in a GeoEvent Service, the GeoEvent is placed on a message queue for the GeoEvent Service to retrieve and process.
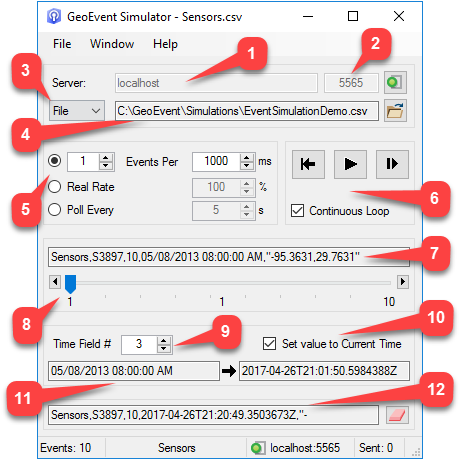
Access GeoEvent Simulator from the Windows ArcGIS program group. Below are some of the key elements of GeoEvent Simulator:

| Property or Field Name | Description |
|---|---|
1 - Server | The hostname of the server to which GeoEvent Simulator should try to connect. The default is localhost. |
2 - TCP Socket | The TCP socket on the specified server to which GeoEvent Simulator should send its simulated event data. |
3 - File / Layer Selector | Specify whether the simulated event data will be loaded from a text file or a feature layer. Simulating data from a CSV file is the most typical use case for GeoEvent Simulator. |
4 - File / Layer Resource | Text field specifying the path name to the file or the URL to the feature layer from which GeoEvent Simulator will retrieve event data. |
5 - Message Rate | The rate at which event data will be sent. The default is to send one event record every 1000 milliseconds. Change this value to send data at a faster rate (for example: 5 messages every 250 milliseconds) or a slower rate (for example: 1 message every 2500 milliseconds). |
6 - Go to Start, Play, Step, and Continuous Loop | Use the Go to Start, Play, and Step controls to set GeoEvent Simulator to the beginning of the event data, to start sending all events, or to send a single event record to GeoEvent Server. Continuous Loopspecifies whether GeoEvent Simulator should continuously loop back (or replay) the event data once the last record is reached. |
7 - Next Event / Messages | Displays a delimited text representation of the next event record to be sent to GeoEvent Server. |
8 - Event Index | Provides the ability to scroll through the simulated event data. As the position changes, the current index displayed in the middle of the range changes to indicate the current event index. |
9 - Time Field # | Choose the field in the simulated event data which specifies the date/time. The array is zero-based, meaning the epoch long integer (in the example illustrated above) is the value immediately to the right of the event record's unique identifier (or TRACK_ID). |
10 - Set Current Time | When checked, GeoEvent Simulator will discard the date/time information retrieved from the simulated event data and replace it with the system's current time. |
11 - Time Value Displays | The text field on the left displays the date/time of the event record retrieved from the simulated event data. The text field on the right displays the date/time that will be sent with the simulated event record. |
12 - Last Event / Message | Displays a delimited text representation of the event record most recently sent to GeoEvent Server. |
Connecting GeoEvent Simulator to GeoEvent Server
Upon opening GeoEvent Simulator for the first time, you will need to connect to a TCP socket hosted by one of your GeoEvent Server inputs before you will be able to send simulated event records to GeoEvent Server. Use GeoEvent Manager to configure a TCP/Text input and set a specific socket GeoEvent Simulator can connect.
With a TCP/Text input configured and started in GeoEvent Server, refer to the steps below to connect GeoEvent Server to GeoEvent Simulator:
- Set the Server and Port values to match those specified in the TCP/Text input (the defaults are localhost and port 5565).
- Click
 to establish the connection between GeoEvent Simulator and GeoEvent Server on the specified server and TCP port. A valid connection has been established when the icon changes to
  .
.
Loading event data into GeoEvent Simulator
To load simulated event data into GeoEvent Simulator you must either browse to a CSV or TXT file whose content represents event data as delimited text or choose to load event data from features in a feature layer.
Load event data from a CSV or TXT fileTo load event data from a CSV or TXT file follow the steps below.
- Set the File/Layer drop-down to File.
- Click
 to browse to a CSV or TXT file and set the following properties as appropriate for your event data.
- Enter a Event Separator and Field Separator if appropriate.
- If the event data has an attribute field with event date/time, choose the Time Field #.
- If the event data includes field names (i.e. headers) for each column, choose how many lines to skip from the top so not to include the field names (i.e. headers).
- Review the event data in the preview window.
- Click Load to load the event data into GeoEvent Simulator.
The event data contained in a CSV or TXT file must have both a clear delimiter between each attribute value and a clear delimiter between each event record. The default delimiters are a comma (,) between attributes and a new-line between event records.
The Load From File dialog displays the first dozen or more event records, parsed using your specified delimiters. It is important that attribute values (e.g. Field 0, Field 1, Field 2, Field 3, etc.) map to attribute fields specified in a GeoEvent Definition and that the values in a CSV or TXT file can be implicitly cast to the data types specified for each attribute in a GeoEvent Definition.
Date/time values can be represented as a string in the ISO 8601 format (e.g. 2016-12-31T23:59:59+00:00) or an epoch long integer expressed in milliseconds (e.g. 1483228799000). The ISO 8601 and epoch long integer formats tend to be less ambiguous, but an input connector will try to interpret string values sent from GeoEvent Simulator such as 12/31/2016 23:59:59 or 12/31/2016 12:59:59 PM as a date.
Another option for loading simulated event data into GeoEvent Simulator is to load feature records from a feature service. Follow the steps below to add event data from a feature service.
- Set the File/Layer drop-down to Layer.
- Click
 to open the Load From Layer dialog
 - Click
 to open the Select Layer dialog and set the properties appropriate for you environment.
- Enter the URL to the server.
- Enter the credentials for connecting to the specified server.
- Click Connect to connect to the specified server.
- Upon successful connection, click Browse to Layer.
- Choose a service folder, feature service, and layer (the URL constructed from these parameters will be displayed) and click OK.
- From the Load From Layer dialog, click
 .
.- Enter the URL used to connect to GeoEvent Server.
- Click OK to establish the connection.
When loading data from a CSV or TXT file, specifying an Event Separator and a Field Separator was necessary so GeoEvent Simulator understood how to interpret the delimited text. When loading event data from a feature layer, you must specify a GeoEvent Definition that GeoEvent Simulator should use to interpret the feature records. Use GeoEvent Manager to import a GeoEvent Definitions from the feature layer by following the high-level steps below.
- Choose the appropriate Input GeoEvent Definition from the drop-down list that matches the schema of the feature layer.
- Accept the default name for the Output GeoEvent Definition Name.
- Click Load to load the feature records from the specified feature service's feature layer.
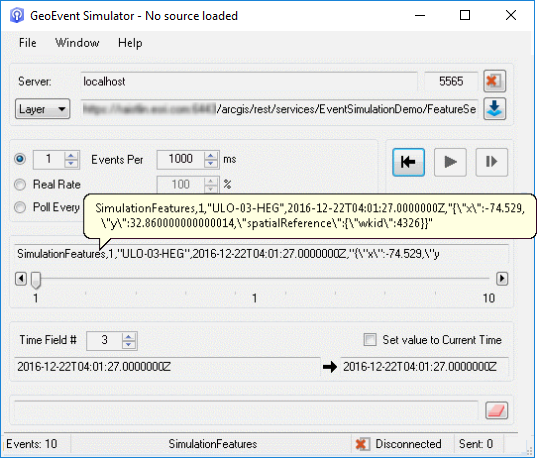
- Review the delimited text representation of the next event record in GeoEvent Simulator's Next Event Message text box. Hover over the text box to view the entire string of the event record as illustrated below.

Notice GeoEvent Simulator prepended the name of the GeoEvent Definition chosen to its delimited text representation of the event record. This delimited text is what GeoEvent Simulator will send to GeoEvent Server.
- Open GeoEvent Manager, set the Receive Text from a TCP Socket Input Connector's Incoming Data Contains GeoEvent Definition property to Yes. The input connector will then expect each event record to include the GeoEvent Definition name.
Since GeoEvent Simulator is sending a JSON representation of the feature record's geometry, ensure the last value in the delimited string maps to a field of type geometry in the GeoEvent Definition that is used by the input connector receiving the event data.
- Optionally, in GeoEvent Simulator, once feature records from a feature service are loaded, you can choose to save the event records to a CSV file by choosing File > Save As from the main menu.